Showing posts with label DIY. Show all posts

Thursday, January 15, 2015

Pom pom power!!!

I'm sure most of you out there have probably already seen these brilliant and easy DIY but I'm a little late to the Pom Pom party!

We had 2 birthday parties this past weekend and as we were wrapping up gifts (yes lil Fi was a great helper!) - I spotted some yellow yarn that was the perfect color to match to the paper. I initially was planning to just tie it up and do a standard bow. When suddenly it hit me... How cute would it be to top the gift with a fuzzy, yellow Pom Pom??


Since I'm a risk taker, I just tried wrapping the yarn around a piece of cardboard, pulled the yarn off the cardboard, knotted a piece of yarn in the middle, then cut all the loops. And it worked!!! 


Here is a tutorial I just found too with more details! http://www.danamadeit.com/2010/12/pom-poms-a-very-simple-tutorial.html

I mean how cute did this turn out???

Now I'm pondering another Pom Pom DIY!!! 

Friday, May 31, 2013

Pinspired Outfit: Sort of DIY Ikat Shorts and Chambray

Yesterday pretty much sums up my week... Morning playdate, Fia naps for 10 minutes in the car while we drive there. Awesome time at festival in the park with new friends and a jump house, petting farm, sno cones, popcorn, and balloon animals! Poop on the my shoe to leave us all with a super smelly ride home. Dinner prepared (just need to pop it in the over), heading out to the local Farmer's Market, Little Man has to pee... and apparently so does the tube of sunscreen he flushed down the toilet :( TGIF!!!

So I found this adorable outfit on Pinterest... that I could not wait to link up for Get Pinspired


And why was I so excited about this outfit??? Because just this week, I FINALLY bought a chambray shirt!!! But back to this adorable outfit... I dug thru my closet trying to find some funky boho looking shorts to no avail. I was super bummed and was just about to give up when I remembered these.


I grabbed these for less than $20 at a Loft final sale last summer and have worn them once! Looking at the pic they look cute but in real life it was ALOT of pattern. So what did I do?


Yes... I cut these beautiful pants! Anyone that knew me in college knows that just about every day I was cutting or piecing stuff together :) Not much has changed!

I cuffed them and threw them on. And here is my outfit!


I really like it and I got this little bonus for my daring DIY...


I literally just stuffed a pillow filler inside one of the legs! So cute right? 

And some other news to report.... As you saw previously I recently became a consultant with Rodan & Fields here. I am so excited about all of these products that I have decided to add a special Skin Care Saturday post. Tune in if you want or just check me out during the week for my usual DIY and Design posts. 

And this week I just hit my first promotion with R+F and to celebrate I am running some crazy specials! Want to get a FREE Mini Facial, Multi Function Eye Cream, 10% off, and free shipping? These are real results from one of my friends!!! Check out my website or email me at nikkimorley.rf@gmail.com for more info!


Tuesday, May 14, 2013

My Space for Craft, Sewing, Blogging (aka. Mom's Office!)

I am not sure how I managed to luck into having a whole room to myself for just me! But I am thrilled beyond belief to have this happy place and also that it is 99% completed! I have been dying to share this space for a week now but I had one project that wasn't quite finished....

My 'office' as the kids like to say is upstairs right next to their play room. And there is a reason you have never really seen it before... It was the storage room for all of the furniture that had no where else to go! It was a mix match of prints, styles, and random pieces that really just needed a place to be hidden when we had people over. I don't really have a full before shot, but these below give you an idea of how messy and thrown together it was!


But now... I LOVE this room! I have a big smile whenever I walk up the stairs and see it. And even now at 5:30am, I am so happy to be sitting in my beautiful room typing this post! The color scheme for the room was chosen on a whim in Hobby Lobby! I had been going back and forth on what the heck I should do with this room. Nothing seemed right until I saw these 2 beautiful cotton duck fabric bolts sitting next to each other. The pink polka dots and the pink/blue/yellow ikat had me at hello! It was all so fun, girly, and funky! (Big thanks to the girls that are hosting the Style Soiree parties! This week's soiree is Kate Spade and I swear that seeing them set up this party gave me the needed push to jump into the pink and polka dots for this room!)


What I love best about this room is that almost everything was a DIY or a piece that we already had! Full source list at the bottom and I will be featuring the details behind the DIYs later this week and next.


Source:

Round Table - Shayne Table from PB
Rattan Basket on Table - WalMart
Baskets under Table - PB
Roll Arm Sofa - Ballard Designs (discontinued)
Pink Greek Key Pillow - DIY
Blue White Stripe Pillow - PB
Gray & White Greek Key Small Pillow - Calico Corners Fabric DIY
Parsons Desk used as Sewing Station (West Elm)
Metal Ampersand - RH Sale
Pink Polka Dot Magnet Board - Hobby Lobby fabric DIY
Cobalt Blue Desk Lamp - DIY
Fur Benches under Desk - DIY
Faux Wood Chair (West Elm)
Window Panels - Hobby Lobby Fabric DIY
Hanging Vinage Llama Rug (thanks mom!)

Thursday, May 9, 2013

DIY Pottery Barn Rope Chandelier

I love me some Pottery Barn.. especially their lighting! But I do not love their prices. So what's a girl to do? Obviously a DIY knock off project to get the look without the big price tag! And the perfect DIY to link up with The Happy Hour Inspiration Link Party and Serenity Now!

While flipping thru a recent PB catalog, I saw the Rope Chandelier with Jute Shades and it was love at first sight (until I saw the $299 price). Check out the views of it below. Beautiful right? I love the texture of the rope and how casual it feels! And don't even get me started on that table...


After a closer look at the pictures, the shape of the chandelier was almost identical to the builder basic one that we just took down in our dining room. I began to wonder if I could really just wrap rope around our old chandelier to make it look like the PB one? 


Supplies:
Old Chandelier
4 bags of Everbilt Manila Rope from HD
Glue Gun
Scissors
Embroidery Hoop
Chandelier Shades

Let me apologize in advance that there are hardly any pictures of how I did this... between the splinters from the rope and the burns from the glue gun, I just wanted to quickly finish off this project and busting out the camera would have really slowed me down.

This chandelier was gathering dust in the garage for a month or so before this project. I removed all of the glass shades and lightbulbs and then got to work. There was no real rhyme or reason to where I started or how I wrapped the rope. I put a dot of hot glue on the chandelier and just started wrapping....


And wrapping....


And wrapping.....


After 5 whole days of working on this project during naps and in the evenings, I was finished with the rope wrapping of the chandelier! Thankfully, the last step was so easy compared to the winding of the rope all around the curves of the chandelier. I took a wooden embroidery hoop, cut it down to fit the width of my chandelier, and then wrapped it with the rope too. I argued with myself on leaving the chandelier as is or adding the hoop but I think that the hoop really completes the look! I need a serious break from the hot glue gun but I love the way that it turned out!

I found 2 chandelier shade options to try. Hobby Lobby was up first. These were the right color but I did not like the pleating on them. Apologies on the night time picture but I was just so excited to get them on that I could not wait! You can't beat Hobby Lobby prices, it was $30 for all 5 of the shades.


Next it was the Lowe's option. These were a bit bigger and the right shape but stark white. They were marked down to $4.99 each so also a great deal at just under $30 for all 5. The Lowe's shades seem to be a better fit in my eyes. Although I am super annoyed with the clip on shades. Its a daily struggle to keep them straight! But I have never seen any other options. Have yall? I am thinking that if I keep the Lowe's ones I will give them a coat of paint in a more natural color. It was so easy for the DIY Painted shades that this would be a piece of cake for the tiny shades!


But in the meantime, here is the finished product for now...


And a quick side by side comparison with my inspiration image.

Tuesday, May 7, 2013

Hanging Paddle Hook Rack

Way back last year, I did this super cute DIY that I could not do anything with because we were just putting our house on the market and there was no use adding more holes to fill! It has taken me quite some time to figure out where the Hooked Paddle should go... I was hoping for the bathroom because it would be so cute with the nautical/pirate theme we have going. No dice on that - the wall space was limited with a linen closet.

We opted to hang it in Little Man's room. It was actually his idea! The paddle had been hiding in the aforementioned bathroom linen closet, until Little Man dragged it out. I loved the idea of him having a place where HE could hang up his towels, jackets, etc.

It is hanging partially behind his door at his height and he LOVES it! He is actually excited for naps and bed time because he gets to take his jammies of the hook to put them on :)


Thursday, May 2, 2013

Jute Trimmed Lampshades

I finally found the perfect finishing touch to my lovely cobalt blue lamps with the painted shades. I argued with keeping the coral trim and even tried another color trim... but in the end the neutral won out!

It was a super easy DIY (my favorite kind!) that I literally completed in 5 minutes. I just had to pull off the existing coral trim and hot glue on the new jute ribbon. And voila ~ Totally new lampshade! An added bonus was that the coral trim was able to be reused for another project that will be seen very soon for the playroom.


I am beyond thrilled at how they turned out! And as you might be able to guess... they are no longer living in my Master Bedroom.  I found a much better home for them that is 2 quick projects away from a full reveal! Any guesses what room they ended up in?

Tuesday, April 30, 2013

Gallery Wall in the Playroom

I have been feeling especially motivated lately and slowly marking off items on the to-do list for the playroom (and lots of other rooms too!) 

I adore the look of a Gallery Wall and in the playroom I get to bring in some unique and quirky items which makes it even more fun! I like to find some unifying force for a Gallery Wall and it was a simple choice to go with a citrine and black color scheme. I shopped the house looking for items that were fun and would fit size, shape, and color wise.

I did pretty good and gathered six pieces to include on the wall. The seventh one was a recent Restoration Hardware steal that worked it's way into the Gallery after Little Man had some fun playing with it. Here are the pics with the details below. I normally lay out the items on the floor and then arrange them accordingly. Once I like the look, I use pieces of paper to get them aligned on the wall so I don't end up making a thousand million holes in the wall. I had the layout just about perfect on the floor when Little Man decided to help me by scattering all of the pieces around the room! Needless to say, there are alot of holes in this wall!


From Top Left (Clockwise):
DIY Framed London Paper from Ballard Designs - details here
RH Carpenter Folding Ruler - source (a steal at $4.49)
Dollar Store 11x14 frame - will soon be filled with a print!
Black and White Framed Print - Me and my BFF at the circus at the age of 4 :)
Antique Ships Wheel - from Little Mans nursery
Fish Print - Gift
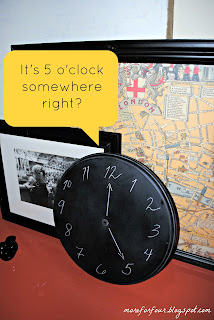
DIY Chalk Clock (Little Man drew this 'target'!) - details here


Thursday, April 25, 2013

Updating a Clock with Chalk

We totally got lucky when we moved that the only damage we had was to minor items (aside from my beloved striped lamp shades!) Another damage that made we sad was this adorable clock that my aunt gave us way back. It has always been a kitchen clock and I loved seeing it every day as we left the house. The clock itself was in great shape but the movers broke the hands. And a clock without hands just isn't a clock! I could not bring myself to give this away and I am SOOOO glad that I didn't!


I actually thought about looking online for a clock kit when it hit me how easy and cute it would be to make this a chalkboard clock and just draw on the numbers and hands! Adorable right? Three quick coats of chalkboard spray paint, a chalk conditioning, and wipe away the dust...


And if you happen to love this but don't have a broken clock, I have seen wooden circles at craft stores for just a few bucks! For now this little clock is perched on the coral dresser but Little Man has been non stop chattering about his chalk clock so I imagine it will soon be moving to the playroom or his room! It is a great way for kids to learn numbers and time telling!

Linking up at Inspiration Gallery Happy Hour Link Party and Serenity Now.

Wednesday, April 24, 2013

(Cheap) Sources for Cabinet Hardware

I recently went on a search for some larger sized cabinet hardware to update a piece of furniture. I truly believe that this extra bling can make or break the piece! Just check out my old Coral Dresser DIY. The color is a wow but the handles... that's what makes it all come together! So where do I look for larger sized cabinet pulls that will work on furniture?

RH is always my first stop.... Are you shocked that I am calling this cheap? Their pulls are outstanding quality and they slash them over half off quite frequently!How about this beauty? It is the Gilmore pull from Restoration Hardware in Antique Brass. It's on final sale right now and marked down to $7.49 for an eight inch pull!


Another RH beauty. The eight inch Adeline pull in Antique Brass for just $6.99! When we were doing our kitchen redo a few years ago this was one of the most used pulls and it's no surprise. It is timeless and would work for a modern or more vintage looking piece.


I just recently discovered that Pottery Barn even sells hardware and while they are very expensive at full price, they do mark them down like crazy! The PB Handle Collection is really cool and offers 3 color choices and 2 sizes (9 inch for $7.99 or 18 inches for $14.99). The large size was originally $55 so grab these quick if you want them!


What is a post about cheap without Ikea? Did you know they sell pulls and knobs? And that they will ship them to you? This is the Blankett Handle and it comes in a ton of sizes from 15-36 inches. This pull needs to be mounted to the top or side of a door but love how clean it looks. They are sold in packs of 2 and the 36 inch ones are only $14.99! What a steal! These only come in a brushed nickel but I have had good luck using both RUb N Buff and spray paint on Ikea handles in the past.

And how about this classic cup pull? It's from Ikea too! The Fagleboda Handle in brass. It also comes in black and chrome. It is a little smaller at just under 4 inches but still a steal $7.99 for 2!


Okay just one more from Ikea.... The Faglavik Handle is another great option. It totally has that schoolhouse feel to it. It also comes in black and chrome and is just under 5 inches. Two of these for $7.99 is an outstanding price!

Do you notice a trend here? I am totally in love with all things brass lately! And I happened to order one of these options for an upcoming DIY project.... I can't wait for them to get here!

Tuesday, April 23, 2013

Hobby Lobby Fabric Find

Today was one of those days.... Not only did both kids give me great naps but I found this beautiful fabric! Does it get better than that?

Yes! With a sale going on it was $6 a yard! And thanks to this fabric I made some pretty big domino changes that are leaving me thrilled!

Hoping to reveal where this fabric is going before the week is over if the kids keep cooperating and I can make a little more nap time progress!

Thursday, April 18, 2013

Lighting Love: Painted Lampshades

As my Master inspiration was falling apart, I started to really struggle to figure out where to go next. I knew that the Ink Trellis cases would be staying so when I saw these beautiful cobalt blue Threshold lamps at Target for $20, I ran like a mad woman to put them in my cart! They are short and wide which works great on our dresser and doesn't block the TV.


I adored the Ikat shades on them and was thisclose to bringing them home with me but I just couldn't commit since I am still so up in the air on the colors. I took the lamp bases home alone and thought that I would try to figure out what to do next. I happened to try out a few of the shades that I have floating around my house and I just loved the way a white shade looked against the blue. So back to Target I went to get some basic white drum shades.

We all know that a trip to Target for one thing inevitably means we get six times as much stuff and you never get what you went for in the first place! I could not refuse a browse down the sale aisle and I found these Threshold coral trimmed medium sized drum shades for $5 each! I suddenly had a stroke of genius! These would be perfect for my blue lamps.


I opted to try something a little different than the usual method of recovering a lampshade.... I decided to try paint! I happened to have a sample of Matte white paint from Home Depot and I used a small art paint brush. Not only did it cover with just one coat, it looks like a beautiful white linen fabric now! In less than an hour, I had 2 white lampshades with coral trim! 


Now the big question is whether the coral will stay in the room or not. I have another thought about taking this DIY to the next level. It all depends of the accent color for the Master. But that's another post for another day!

Linking up at Inspiration Gallery Link Happy Hour Party and Serenity Now