Wednesday, January 30, 2013

Lighting Love

I have been of the hunt for a light fixture to upgrade from our boring basic builder's chandeliers. I have been very slow to pull the trigger because I am trying to take it slow and make sure I am getting something I really love (not to mention at a great price too!)

I am loving the look of the organic, vintage, farmhouse lanterns. And I adore these beautiful lights from Shades of Light! If only I had $500 to drop on one light fixture :(


And no post on dream lighting would ever be complete without me including my ultimate dream light fixture... Circa Lighting's Thomas O'Brien Hicks Pendant. A moment of silence please to enjoy this beautiful work of art!


Okay, back to reality! I got an email that World Market was having 30% off lighting plus an extra 15% for Explorer members. So, I packed up the kids and we headed out to check out some lights! Thankfully, my kiddos LOVE to shop and can easily be bribed with food! I had my eye peeled for a couple of the fixtures that caught my interest online and I was floored to see that the online pictures do nothing for the lights!

It was love at first sight for me... and the Honeycomb Chandelier!


I nabbed the very last one that the store had and it was actually the display! The chandelier is huge... like 2 feet across and 16 inches tall. It will make quite a statement piece and I adore that it's just so different. Oh yeah, and it was just shy of $100!

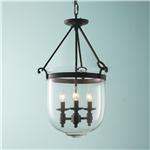
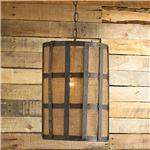
But I must say that I fell in like with one that isn't quite right for my style but would look awesome in many different settings. Check out this uber chic pendant! The shape was unique and the inside of the shade was a beautiful gold leaf. Yeah - go grab the Black Iron Bell Pendant today if you are looking for a clean mod look at a great price! It was %89 plus the 45% off!


So now the big question is.... where to put it? As we pulled into the house, Little Man excitedly asked if he could skip his nap and help me decide where our new 'light' should go! I love that little dude! I love the light so much that I really want it to go in the breakfast nook so I can see it daily but I know it would be perfect in the dining room as well.....

Shower Rings to Drapery Hooks

As I mentioned yesterday, I needed the extra couple of inches that drapery hooks provide for my DIY pom pom panels. I set out to Target over the weekend to grab some basic 1.5 inch ones and was floored to see that those size hooks were nearly $10 and I needed to get 2 sets! I knew that I could find something cheaper online but I was itching to get these panels up and didn't want to wait for the hooks to show up in a few days.

What's a girl to do? I kept thinking as I walked the aisles of Target and as I made my way up the Bath aisle, the perfect solution appeared!

At $1.99 for a pack of 12 the price was perfect too!

Once I got home, I dug thru my spray paint stash... I decided on the Rustoleum Hammered spray paint that happened to be a very close match to the drapery hardware.


2 light coats of spray paint

Looking slightly hammered 

Then I let the rings dry for about an hour. Once dry I closed the rings and got to work with my needle and thread and a tape measure. I used 6 rings per panel so I needed to measure out where they should go. Once I had the panels marked, I sewed each of the rings to the panels with a couple of hand stitches. It was really that easy!

Up close view of sewn on rings

Love the look and that my panels now touch the floor! 

Tuesday, January 29, 2013

Pom Pom Trim Curtains

Being that we are on a pretty tight budget, I knew that repurposing was going to be a key theme as I took on the playroom design. Luckily I am a hoarder of all things decor related so I have a lot of options to choose from!

Way back when the hubs and I first got married, we got these great Ballard Essential Chocolate panels to help block out some of the pesky sun in our master room.... fast forward a few years and they are still in great shape but we no longer have the time for midday naps thanks to the 2 munchkins and if we did we are so exhausted we could easily sleep in broad daylight! We have two 108 inch ones and two 84 inch panels. I have now learned that I should never buy shorter than 96 inch panels! And to make matters worse the 84 inch panels somehow only measure 82 inches now which won't even cover the top of the window thanks to our new taller ceilings! It was a no brainer to relocate these curtains up to the playroom since it has 3 sets of windows.

I wanted to do something a little more fun than just the plain panels and I have been obsessing over the ball pom pom trim on panels for ages! I wanted to do it in Fiona's room but I could not find the right color of purple. Luckily, Hobby Lobby had the perfect color (and priced) mini ball trim! I used a 40% off coupon and ran home excited to get started.

It is a super easy project to trim the panels and my trusty hot glue gun was ready to help. Before I started trimming, I decided to let the hem on the 84 inch panels. I ripped the existing 4 inch hem and used a half inch hem. It worked perfectly to give me a little more length. Then I laid the panels on the kitchen table and hot glued away. I trimmed the leading edges of the panels during 2 nap times. I love the way it looks!

But there will be no big reveal today.... Even with the taken out hem, the panels still need a little more length. What to do??? Add curtain clip rings of course! But I have a great take on them that I will reveal tomorrow along with the full shots of my Pom Pom trimmed panels.


I was excited to see the new KidShop by Serena and Lily in their newest catalog and thrilled to see their tassel trimmed panels @ $78 per panel! I adore them, so I knew right away that making these for the playroom was a perfect decision! I love it when I find that type of affirmation on a DIY project!


Sunday, January 27, 2013

Banana Oat Breakfast Cookies

What would we do without Pinterest? I recently came across this AMAZING recipe and I have made 2 batches of this super delicious cookies in less than 4 days! So I decided to link this up at the Dog Days of Winter Make It Linky Party. Did I mention that they are actually healthy??? Oh yeah... and I had to make 2 batches because I devoured them before I got to take any pictures of the finished product! Trust me and make these ASAP!

Of course, I like to mix it up a bit but here is the original recipe that I pinned.

Ingredients:
2 cups of Oatmeal (uncooked)
3 ripe bananas (mashed with fork)
1 1/2 cups of applesauce
1 small package of raisins
1 splash of vanilla
Cinnamon to taste

Optional:
1 spoonful of Peanut Butter
1/2 cup chocolate chips
1/2 cup nuts or dried fruit of choice

Yes! This is really all that you need!


Preheat heat oven to 350 degrees.
Mix together vanilla, cinnamon, applesauce and bananas. 
Blend applesauce mixture with all other ingredients & let sit for 10 minutes.
Scoop 'dough' onto lightly greased cookie sheet. I opted to scoop it into muffin tins for better portion control on batch number 2!
Bake for about 25 minutes.
Remove from oven. Store in a covered container when completely cool.


Bananas all mashed

Let the mixture sit for 10 minutes 

All scooped into our muffin tins

All cooked and ready to eat! 

 Grab them quick before they are gone!

 I love that it tastes like a yummy bowl of oatmeal that I can eat on the go!


Thursday, January 24, 2013

Playroom Inspiration

I suddenly had a flash of genius a few weeks ago.... and it led me down an interesting path of inspiration for the playroom. Our story starts off with 2 beautifully coordinated fabrics in a lovely shade of yellowy gold. They were selected specifically to be used in a play space. Unfortunately, some other fabrics (Dwell Gate Bella Porte you know who you are!) pushed these plans aside and the Dwell Vintage Blossom made its way to our master bedroom.


I loved the brightness of it against the white bedding but I am itching for something new and it is begging to be reunited with its long lost friend the Schumacher Celerie Kemble fabric (as seen on the DIY bench/ottoman).

The obvious solution? A playroom in lively shades of citrine, browns, and reds! Check out the inspiration behind the room and stay tuned as I DIY it into existence!

Wednesday, January 23, 2013

Kid's Chalk Play Table

I am thisclose to having the mood board for the kid's playroom finished and I am so excited to get started on it that I just had to do a playroom project!

Since we have a dedicated play room in the new house, lots of stuff has been able to be included in the room. Like the old coffee table and this cute bench that I made a while ago.

Here it is in the playroom and it has worked out great for a play table and 
I don't have to worry about kiddie chairs tipping over.

Unfortunately, the table needs some work. The top is scratched and covered in peeling paint. 
It s shard to see in this pic, but trust me it's there!

So I took the table out to the garage and gave it a quick sanding.

Think I use this stuff alot?

Then 2 coats of my chalk paint

Another clue you chalk paint too much... your almost 3 year old knows how to help condition it!

All covered and conditioned!

The final product...

Little Man's favorite part? Drawing train tracks on the table for his train!

PS - The bench has now been retired. Let's just say that Fia's climbing skills have improved and after finding her sitting on this table I realized that it needs to go! Luckily, I have a great plan in the works!

Monday, January 21, 2013

Cinnamon Rolls from Scratch!

In episode 2 of Mange` Mondays, we decided to tackle a family favorite.... Cinnamon Rolls! We typically use the refrigerated cans that you just pop into the oven, bake, and then ice. But the extra 10 minutes to make these are so worth it once you try them! Plus, Little Man loved getting in on the action and got to really help!

I happened to find this amazing yeast free recipe on Iowa Girl Eats and thought that it was a worth a shot. As usual, I made some changes but here is the Original Recipe.


Cinnamon Filling:
3/4 cup packed brown sugar
1/2 cup granulated sugar
1 Tablespoon cinnamon
1/2 teaspoon salt
2 Tablespoons Earth Balance non dairy butter, melted


For the Dough:
2-1/2 cups all purpose flour, plus more for rolling out dough
1/4 cup granulated sugar
1-1/2 teaspoons baking powder
1/2 teaspoon baking soda
1/2 teaspoon salt
1 cup lowfat buttermilk
4 Tablespoons Earth Balance non dairy butter melted

For the Icing:
3 ounces cream cheese softened
4 tablespoons lowfat buttermilk
1 cup powdered sugar


1. Preheat oven to 425. Combine filling ingredients in a small bowl, then mix with a fork until well blended.

2. In a another, larger bowl, combine flour, sugar, baking powder, baking soda and salt. Whisk together buttermilk and melted butter in a separate bowl, then pour into the middle of the dry ingredients. Stir together until dough just comes together (do not overmix.) Kneed slightly with your hands until the dough forms into a ball, then slice it in half.

3. On a lightly floured surface, roll each half into a 12×8″ rectangle (think slightly longer than a sheet of paper.) Press half the filling mixture into the center, leaving 1/4″ of the dough clear on all 4 sides, then roll like a sausage. Pinch together seam, trim ends and cut into 8 slices. Repeat with the other dough half, then place rolls in a non-stick sprayed 11×8″ pan. Bake for 15 minutes.
4. Meanwhile, to make the icing, mash together softened cream cheese and powdered sugar with a fork until smooth. Whisk in buttermilk, 1 Tablespoon at a time, until creamy. Drizzle onto hot cinnamon rolls and spread evenly.


Little Man stirring the filling

Making the dough 

Dough rolled out and filling added. Now rolling it up!

Cutting it into slices

The four rolls that I put in the pan...

I will let you guess who placed the rest of the rolls...

Iced and they all taste amazing.... even the odd shaped ones!

Pure heaven!!!!

Linking up at Serenity Now!

Sunday, January 20, 2013

Glass Table is Now Golden

I am so happy that the Dog Days of Winter challenges are happening to keep me on my toes and motivated. I have so much old to me stuff, that picking which one to work on for the Thrift-It Linky Party was more time consuming than the actual project I chose to work on!

We have this metal and glass table from the in-laws which actually matches the bed in one of our guest rooms. I thought that it had great lines but wasn't thrilled about the matchy matchy look combined with the black metal bed. I have been dying to do something to the bed itself but decided that it was better to start small and this little side table got volunteered to be the guinea pig!

The before shot...

The before shot with the twisty cylinder thing removed from the base..

A quick 2 coats of this awesome spray paint...

After the first coat, looking promising!

The second (and upside down) coat looking even better!

The table's new home (next to the matching bed!)

Almost home and looking totally different!

WOW!!! What a difference a coat of spray paint makes on this metal and glass table!


The full room shot with the table LOVING its new home!

And of course, the DIY Entertainment Center lives here too! 
What a great accent with the golden brass pulls.

So now that the table is golden, it has me wondering what in the world to do with the bed? I originally wanted to do it gold but with the table I think it would be too much. Surprisingly, the hubs is not a fan of the gold so that is two strikes against it...

What do you think? I am 100% changing out the twisty things to something a bit more vintage looking, maybe even something gold. But should I leave it black? White? A rubbed bronze? A muted turquoise? What do you think?

Source: Design Kastle

Source: Brunch @ Saks

Source: http://absolutelybeautifulthings.blogspot.com