Showing posts with label Kitchen. Show all posts

Wednesday, January 30, 2013

Lighting Love

I have been of the hunt for a light fixture to upgrade from our boring basic builder's chandeliers. I have been very slow to pull the trigger because I am trying to take it slow and make sure I am getting something I really love (not to mention at a great price too!)

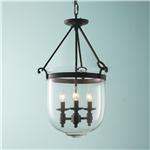
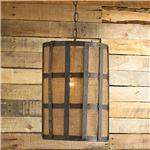
I am loving the look of the organic, vintage, farmhouse lanterns. And I adore these beautiful lights from Shades of Light! If only I had $500 to drop on one light fixture :(


And no post on dream lighting would ever be complete without me including my ultimate dream light fixture... Circa Lighting's Thomas O'Brien Hicks Pendant. A moment of silence please to enjoy this beautiful work of art!


Okay, back to reality! I got an email that World Market was having 30% off lighting plus an extra 15% for Explorer members. So, I packed up the kids and we headed out to check out some lights! Thankfully, my kiddos LOVE to shop and can easily be bribed with food! I had my eye peeled for a couple of the fixtures that caught my interest online and I was floored to see that the online pictures do nothing for the lights!

It was love at first sight for me... and the Honeycomb Chandelier!


I nabbed the very last one that the store had and it was actually the display! The chandelier is huge... like 2 feet across and 16 inches tall. It will make quite a statement piece and I adore that it's just so different. Oh yeah, and it was just shy of $100!

But I must say that I fell in like with one that isn't quite right for my style but would look awesome in many different settings. Check out this uber chic pendant! The shape was unique and the inside of the shade was a beautiful gold leaf. Yeah - go grab the Black Iron Bell Pendant today if you are looking for a clean mod look at a great price! It was %89 plus the 45% off!


So now the big question is.... where to put it? As we pulled into the house, Little Man excitedly asked if he could skip his nap and help me decide where our new 'light' should go! I love that little dude! I love the light so much that I really want it to go in the breakfast nook so I can see it daily but I know it would be perfect in the dining room as well.....

Friday, January 4, 2013

Pegboard in the Pantry

We are still in the midst of the holiday madness here! Is it already Friday? With New Years, a visit from friends on the 1st, and a quickie trip to New Orleans for the Sugar Bowl (thanks to the grandparents for letting us have a kid free trip!) it's been a busy week indeed! Thus the New Years resolutions start around here next week...

But one of the first things I checked off my to do list just might prove to be very helpful for those of you trying to get organized. It was honestly one of the favorite DIY projects to date and I was very happy to be able replicate it in our new house. In fact I loved it so much that this was up and functioning day 2 in the house before I even got my closet unpacked. Yeah, that is love! So here is the Pegboard Pantry version 2! Apologies for poor picture quality, the camera charger is still missing so all of these are via my new iPhone!


Unfortunately, I did not chronicle the step by step process this time (with being surrounded by 496 boxes and such) but luckily I captured it all in my original peg pantry post. The only difference was that this time the hubs decided to use wood instead of the peg spacers to mount the pegboard to the wall. Its a little easier than trying to hold the spacers and screw them in while working in a tight space like a pantry.


Just think of all the time and drawer space you will save with this easy and inexpensive project!

Linking up at Serenity Now!

Thursday, September 27, 2012

An Oldie... But a Goodie. Kitchen Part 1

Seeing as we are moving in the not so near future, it seemed fitting to look back at our first 'real' home project. Sure... We had painted, hung curtains, and done other small things to improve our home but this was a biggie! Best of all is my wonderful timing, this project would finish on the Friday before my son's blowout first birthday party with nearly 50 of our closest family and friends. Yeah... Not at all stressful!

I loved our house the first time we walked in (and it was actually the very first house that we looked at!) I loved the floor plan, the fenced nature view lot, the neutral color palette... The only thing that was a real deal breaker for me was the laminate counters not only in all of the bathrooms but also in the kitchen! I hated them! But I obviously knew that this was an easily remedied issue, so we got our dream house and planned to pick our perfect countertops when everything settled down. Two months after moving in, I was pregnant and then came baby, and before we knew it nearly 2 years had passed. We started discussing the kitchen renovation in January 2011 as we filed our taxes and were trying to decide where our tax money should go.

We ended up going with a smaller granite shop that gave us such a great price that we decided to go ahead and just do our 3 bathrooms as well! Then came the real fun.... Basically 4 projects rolled into one! I needed to make 4 sink, faucet, granite color, backsplash, and lighting choices at the same time! So I set off to make this all happen in our 30 day window.
The key for me was staying organized with all of the moving parts, including a general contractor, plumber, and more.

Using a pretty basic excel spreadsheet, I was able to not only stay organized but also stay on budget. We had a number for a budget that I really wanted to stay with and keeping it in excel allowed me to play with the numbers to make it happen. I started off with the costs that we knew for the granite, labor, etc. from there I worked my way down starting with the kitchen and filled in all the blanks knowing that sending more in one room meant that I would need to be more frugal in other places.

So on to the fun stuff.... I will start with the kitchen for today's post.

Our kitchen opens directly to our family room and breakfast nook. The kitchen island was two tiered and was nice to help separate the rooms but the bar on the island was less than ten inches deep which made it virtually unusable for eating or anything else for that matter! While visiting friends in Philly who fell in love with their one huge level island separating their kitchen and family room. There was so much usable space and the space seemed so open! We knew that it was now or never so we decided to just go for it! Our GC gave us a very reasonable estimate for the work and we were sold! The fun part of this was that our GC would need to chop down the second level of the island prior to the granite shop making templates. So had a few days of a somewhat non working kitchen. Pardon the dust, mess, and horrible counter tips!


The easiest choice of all for me was the backsplash. I had stumbled across a blog with the most beautiful kitchen tansformation and I knew right away that this was the tile for me... Off white subway style, with a crackle finish, and beveled edge. It was love at first sight and luckily a local tile store carried the brand so I was able get a sample of the available colors. I then soured the Internet and found a great price with super fast shipping on Fast Floors. Mark that off my list!

Chatting at the Sky - Backsplash Inspiration
Fast Floors Adex USA Hampton Bisque in the smaller mesh backed size

After many years of fighting with and hating my stainless steel sinks, I knew there had to be a better alternative. In an perfect kitchen world, a farmhouse sink would be where I would spend my evenings doing dishes. But I resigned myself to holding out for that sink in our dream house that we will one day build as I realized that switching to this style of sink would require reworking cabinets and a lot more money than I wanted to shell out! I stumbled upon the Blanco Silgranit sinks in several renovation blogs. They had amazing reviews and I thought that they could be a perfect fit. Another thing I learned was that when a sink is in an open island, going with a single basin sink helps to keep the view nice and clear even when there are a sink full of dirty dishes. The only catch? I need to see and feel something like a sink prior to choosing it. We lucked out that our local Ferguson Showroom had several samples of this composite sink and many more sink and faucet options!

Talk about heaven! An entire showroom full of sinks, faucets, lighting, mirrors, appliances.... The hubby and I made a full tour and to my surprise hubs loved the Silgranite Super Single Sink. But while I was in this amazing showroom I needed to make sure this was THE sink. A Kohler cast iron sink caught my eye on the way in and I needed to know more about it. Unfortunately, this beautiful sink in the color I wanted (Caviar) was a special order that would take 6-8 weeks and was also nearly $700! Yikes! This made up my mind and I again turned to the internet for 2 day shipping and another great deal on the Blanco Silgranite Anthracite (black) sink from Home Click. They were a great company to work with and even helped me locate my sink after hours when I was nervously stressing about getting it in time for our granite templates to be made. We ended up under $400 for the sink and the shipping charges!

Blanco Super Single in Brown (Anthracite seems to be out of stock)

(Side Note - I will admit that I was a little OCD with the sink and actually made a pit stop on the way to a friends wedding to buy one of these sinks for fear that the one we ordered online might in some way be damaged and would mess up our very tight timeline.)

While we were in Ferguson's I managed to drab the hubby into the faucet section too! We almost immediately agreed on a style that we loved but again the price nearly got us at well over $600! What??? So again I resigned to internet searching and found it substantially cheaper (plus we ordered all of our other faucets from them at an even bigger discount!)

Faucet Direct - Grohe Minta Stainless Faucet

And finally - it was all decided!!!! What a huge weight off my shoulders until it came to D-Day and I was like a kid on Christmas morning so excited to see it all together and praying that it would exceed my expectations... and it did!!!!


And what the kitchen looks like today? Stayed tuned tomorrow!

Wednesday, August 22, 2012

The Piece de Resistance!

As I have shown this week, we made lots of changes to our pantry. I organized, took down shelves, and added a spice rack here. And then chalkboard panels on the door here. I love these updates but the real winner for me is today's addition. This is another vision that I have had floating around in  my head for months now but they always take me a bit to build up the courage to complete them. And then I kick myself that I waited so long!

We are very lucky to have a nice sized kitchen but with so many gadgets, utensils, and cooking tools it's often hard to find what you are looking for easily. Check out our utensil stand and cooking drawer. Impossible to easily find anything...


And so with my newly cleared wall in the pantry I knew just what we needed! A pegboard in the pantry!!! It sounds a little far fetched but wait until you see the end result!

2 foot by 4 foot piece of pegboard 

the empty wall in the pantry... 

a nifty little box of pegboard accessories (including mounting spacers) $11 at Home Depot

2 quick coats of chalkboard paint... since I already had it out! Makes labeling super easy though! 

Chalkboard conditioning... 

A quick wipe down (while hubby recounted his love of erasing chalkboards in grade school) 

To mount, you use the spacers and basically screw it into the wall. We used 12 spacers. The package only came with 4 so make sure to buy extras. Also, it is helpful to glue the spacers to the back of the pegboard and then screw them in if you are working in a tight space or using a large pegboard. Otherwise, you are trying to contort your hand behind the board to place the spacers!

Hanging and ready to load it up! 

Are you ready to be jealous??? I must say that I love this new addition. It is by far my FAVORITE aspect of the pantry redo! I now have an empty drawer, some cleared up counter space, and more room in my kitchen cabinets in addition to being able to easily see all of my kitchen tools! LOVE!


We moved this nifty little gadget to the other wall. It holds your plastic grocery bags for easy storage and access. We have one in the pantry downstairs and one upstairs in the laundry room. A definite must have!


PS. I linked this project at Serenity Now and Our Fifth House Organize It Linky Party

Monday, August 20, 2012

Working on the Pantry

Lately, I have been trying to focus not only on the decor of the house but also on the organization. Its an area that I strive to become better at! I have resolved myself to dedicating at least one of my weekly posts to this topic so here is the first of many Manic Organization Monday!

My pantry has been a source of frustration for as long as we have lived here. It is a large space but the set up wasn't exactly the best utilization of the space. The fact that it is a walk in is nice but it is a small square shape so you lose a lot of functionality in the corners. Below are some before shots (and this is not nearly as messy/disorganized as it has gotten before!)


So I started off by taking everything out of the pantry.... about midway thru I ran out of counter space! I also threw away alot of stuff. We had 3 jars of pickles that were expired that have been hanging out way in the back for over a year! Yeah - it was a mess!


Once the pantry was empty I looked at the layout a little closer. The shelves to the right are not that long and since we have the trash can in there too there are only three of them. I made a rash decision and pulled them down! This left me with 2 free walls and access to all of the remaining shelves! Finally, I was getting somewhere! I grouped like items together and started putting the pantry back together. What an improvement!


Now taking down those 3 shelves meant that I needed to do something with all of the stuff that was on them. The top shelf was paper supplies and cups. So that was an easy move to the kitchen cabinets where I keep my entertaining platters and such. Duh! It is so nice to have all of my party stuff together! Then taking a hint from another pantry project I saw recently (if only I could remember which blog!) I moved all of my baking supplies to a rattan box that keeps everything together and makes it super easy to just pull the box out when its baking time.

The second shelf housed several lazy susan's filled with spices and seasonings. We use these often and it is one of the areas that gets the most disorganized. I found a very easy solution that I love. A three tier wall mounted spice rack at Home Depot! Now our spices are easy to access since they are all visible (and alphabetized!)


Snacks were moved from their cardboard boxes to glass canisters. Easy to see when they are empty and easy to quickly grab when we are leaving the house in a hurry! Extra boxes are placed behind the canisters for easy refills!


All of our baby and kid snacks are grouped together too!


The bottom shelf holds our canned goods and extras of bigger items such as juices.


All in all - this change has made a HUGE change in the feel of the pantry.... but there are 2 more changes that really take it to the next level! More on that tomorrow and Wednesday!

Friday, June 29, 2012

Kitchen Chandelier Update

As a part of our kitchen renovation, I started cruising the internet for some new lighting options. We were looking for a chandelier to hang over our table in the breakfast nook and also for 2-3 pendant lights to hang over our island (these were currently recessed lights).

I was really struggling to find something that I liked that wasn't going to cost me a fortune (the story of my life!). Then one day, I hopped on Overstock. I was floored at all of the great lighting options and the GREAT prices! Lots of them looked just like the lights I had seen at Pottery Barn or other retailers for substantially less. But because I needed to purchase at least 3 lights, these were still above my budget. I happened upon 2 potential chandeliers and decided to just order them and see what they looked like in real life.

The One we Sent Back
Our Overstock Chandelier

The first one was more expensive and it was actually really small in person. The second one was really big and it was a different finish than what it looked like on the web. It was actually a brushed nickel with portions of the chandelier in a matte black and then the glass was topped with more of a chrome finish. The finishes were a deal breaker for me but the bones of the piece were good so I decided to try my hand at making some changes to it!

The before:


So after the hubby lovingly hung the chandelier.... I waited until he was at work the next day, shut off the electricity, and took it down to work some magic on it!

First - I taped off the wiring on the chandelier, the glass, and the actual area where the light bulbs go. Its hard to see but the piece that actually holds the light bulb was originally black too. Luckily - these are just housings for the wiring and slip right off. That was the first piece I painted. They went from black to white thanks to a quick couple of coats of spray paint.

And then the real transformation began! I set up a broom across 2 patio chairs in the very back of our yard and hung the chandelier out there so I could get to work with some more spray paint.


I did several base coats of the Hammered Dark Bronze color and then a light dusting of the Hammered Silver to give it a more flecked and worn look. I toyed with taping off the glass and spraying that too but I ended up using QTips and dabbing the color on following spraying some paint onto a paper plate. Yes - I am really creative!

After a quick dry time - it was back inside and up it went to see how I did! I was pleasantly surprised with how much of a difference a little paint can make! It now has a more vintage feel than than the super modern look when it was black. I also really love how painting the pieces that hold the light bulbs now make it seem like these are candles! The white is the perfect contrast to the dark finish! The icing on the cake for me was that since the color was sprayed on I knew that I could match whatever pendant lights I finally found! (Ironically - this was a moot point to be covered on another post!)

And here are the afters!