Tuesday, April 30, 2013

Gallery Wall in the Playroom

I have been feeling especially motivated lately and slowly marking off items on the to-do list for the playroom (and lots of other rooms too!) 

I adore the look of a Gallery Wall and in the playroom I get to bring in some unique and quirky items which makes it even more fun! I like to find some unifying force for a Gallery Wall and it was a simple choice to go with a citrine and black color scheme. I shopped the house looking for items that were fun and would fit size, shape, and color wise.

I did pretty good and gathered six pieces to include on the wall. The seventh one was a recent Restoration Hardware steal that worked it's way into the Gallery after Little Man had some fun playing with it. Here are the pics with the details below. I normally lay out the items on the floor and then arrange them accordingly. Once I like the look, I use pieces of paper to get them aligned on the wall so I don't end up making a thousand million holes in the wall. I had the layout just about perfect on the floor when Little Man decided to help me by scattering all of the pieces around the room! Needless to say, there are alot of holes in this wall!


From Top Left (Clockwise):
DIY Framed London Paper from Ballard Designs - details here
RH Carpenter Folding Ruler - source (a steal at $4.49)
Dollar Store 11x14 frame - will soon be filled with a print!
Black and White Framed Print - Me and my BFF at the circus at the age of 4 :)
Antique Ships Wheel - from Little Mans nursery
Fish Print - Gift
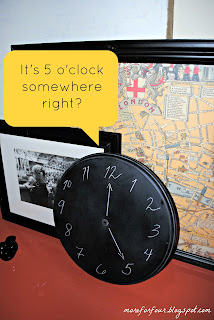
DIY Chalk Clock (Little Man drew this 'target'!) - details here


Monday, April 29, 2013

Healthy Pancakes

I love breakfast! Well, really I love every meal but I especially love breakfast! We are early risers here so it works great to spend some time cooking in the kitchen with the kids before the day gets too crazy. I also like knowing that the kids are getting some fruits, fiber, and protein without even realizing it. I am so sneaky!

1 cup Old Fashioned Oats
1/2 cup milk
1/2 cup greek yogurt
1/2 cup flour
1 1/4 tsp baking powder
1 1/2 Tbsp Applesauce
1 Tbsp Flax seed
2 Tbsp Water
1 Ripe Banana (mashed)

1. Place the oats, milk, yogurt, and banana into a blender or food processor. Blend about 1 minute (you can also let these ingredients soak together in a bowl for 20 minutes... but I don't have that kind of time with 2 hungry kids!)

2. Add the oat mixture to the remaining ingredients in a mixing bowl. Mix until combined. Little Man is OBSESSED with adding food color to everything... so we also add in a few drops of food color at this point.

3. Cook on a griddle over medium high heat. Flip when bubbles appear on the top of the pancake.

4. Top with fruit, syrup, honey.... anything!!!


Here is the original Recipe that I made some changes to! It's a great start to the day and they can even be refrigerated and reheated the next day for a quick breakfast of mid day snack!

Friday, April 26, 2013

Stripes for Springtime

I am linking up with Sheaffer, Shay, and Mel at Get Pinspired!

I recently got this adorable striped shirt at Private Gallery. I love the material and it is a great piece to dress up, dress down, and throw on when I quickly need to get out the door. If you are in the market for a great striped shirt this one rocks for only $24!


I know that stripes are like a neutral and that there are a million options to play with.... but I needed some help! I found 3 outfits that I wanted to try out using the striped shirt for springtime looks. So lets get started!

OUTFIT 1: Stripes & Coral


I think that this look would be awesome with the floral tote or even a floral scarf. Only I don't have either.... sigh. So its just stripes and coral for now! I am adding a chunky gold necklace to my shopping list because that would totally complete this outfit too!


And then I realize that I do have a graphic scarf that just might work...


OUTFIT 2: Stripes & Green

I loved both of these inspiration pictures! The green and navy is such a fresh and lively combo!


Source


I threw on my new wedges with this outfit for a cute summer date look. And this scarf is from World Market. Super cute right? I bought it hoping to make it into pillows but I am not sure my closet is willing to make the sacrifice! Again, that chunky gold necklace would totally work to dress this down with some flat sandals too.

OUTFIT 3: Stripes and Yellow

I am pretty sure that EVERY single person alive has this pinned. Its such a put together look! White jeans are another item on my shopping list and in the meantime I switched this look up wearing jeans since I also don't have a chambray shirt!


And what a fun way to translate this for spring or summer?

Thursday, April 25, 2013

Updating a Clock with Chalk

We totally got lucky when we moved that the only damage we had was to minor items (aside from my beloved striped lamp shades!) Another damage that made we sad was this adorable clock that my aunt gave us way back. It has always been a kitchen clock and I loved seeing it every day as we left the house. The clock itself was in great shape but the movers broke the hands. And a clock without hands just isn't a clock! I could not bring myself to give this away and I am SOOOO glad that I didn't!


I actually thought about looking online for a clock kit when it hit me how easy and cute it would be to make this a chalkboard clock and just draw on the numbers and hands! Adorable right? Three quick coats of chalkboard spray paint, a chalk conditioning, and wipe away the dust...


And if you happen to love this but don't have a broken clock, I have seen wooden circles at craft stores for just a few bucks! For now this little clock is perched on the coral dresser but Little Man has been non stop chattering about his chalk clock so I imagine it will soon be moving to the playroom or his room! It is a great way for kids to learn numbers and time telling!

Linking up at Inspiration Gallery Happy Hour Link Party and Serenity Now.

Wednesday, April 24, 2013

(Cheap) Sources for Cabinet Hardware

I recently went on a search for some larger sized cabinet hardware to update a piece of furniture. I truly believe that this extra bling can make or break the piece! Just check out my old Coral Dresser DIY. The color is a wow but the handles... that's what makes it all come together! So where do I look for larger sized cabinet pulls that will work on furniture?

RH is always my first stop.... Are you shocked that I am calling this cheap? Their pulls are outstanding quality and they slash them over half off quite frequently!How about this beauty? It is the Gilmore pull from Restoration Hardware in Antique Brass. It's on final sale right now and marked down to $7.49 for an eight inch pull!


Another RH beauty. The eight inch Adeline pull in Antique Brass for just $6.99! When we were doing our kitchen redo a few years ago this was one of the most used pulls and it's no surprise. It is timeless and would work for a modern or more vintage looking piece.


I just recently discovered that Pottery Barn even sells hardware and while they are very expensive at full price, they do mark them down like crazy! The PB Handle Collection is really cool and offers 3 color choices and 2 sizes (9 inch for $7.99 or 18 inches for $14.99). The large size was originally $55 so grab these quick if you want them!


What is a post about cheap without Ikea? Did you know they sell pulls and knobs? And that they will ship them to you? This is the Blankett Handle and it comes in a ton of sizes from 15-36 inches. This pull needs to be mounted to the top or side of a door but love how clean it looks. They are sold in packs of 2 and the 36 inch ones are only $14.99! What a steal! These only come in a brushed nickel but I have had good luck using both RUb N Buff and spray paint on Ikea handles in the past.

And how about this classic cup pull? It's from Ikea too! The Fagleboda Handle in brass. It also comes in black and chrome. It is a little smaller at just under 4 inches but still a steal $7.99 for 2!


Okay just one more from Ikea.... The Faglavik Handle is another great option. It totally has that schoolhouse feel to it. It also comes in black and chrome and is just under 5 inches. Two of these for $7.99 is an outstanding price!

Do you notice a trend here? I am totally in love with all things brass lately! And I happened to order one of these options for an upcoming DIY project.... I can't wait for them to get here!

Tuesday, April 23, 2013

Hobby Lobby Fabric Find

Today was one of those days.... Not only did both kids give me great naps but I found this beautiful fabric! Does it get better than that?

Yes! With a sale going on it was $6 a yard! And thanks to this fabric I made some pretty big domino changes that are leaving me thrilled!

Hoping to reveal where this fabric is going before the week is over if the kids keep cooperating and I can make a little more nap time progress!

Monday, April 22, 2013

Apple Orange Cranberry Oatmeal Muffins

With all of this amazing springtime weather, I was instantly pulled to make some yummy and healthy breakfast muffins for the kids. Something about this warm weather makes me think of apples, oranges, and fresh fruit. So why not throw a bunch of fruits into a muffin?

I used this recipe as a base and made some changes.... These were so good that there is no pretty shot at the end because we ate me ALL before I could take one!


  • 1-1/2 cups quick-cooking oats
  • 1-1/4 cups all-purpose flour
  • 1/2 cup packed brown sugar
  • 1 teaspoon baking powder
  • 3/4 teaspoon baking soda
  • 3/4 teaspoon ground cinnamon
  • 1/2 teaspoon salt
  • 1 cup unsweetened applesauce
  • Zest of one orange
  • 1/2 cup dried cranberries
  • 1 Granny smith apple (peeled and diced)
  • 1/2 cup fat-free milk
  • 2 flax eggs (2tbsp flax seed + 4tbsp water)
  • 1/4 cup quick-cooking oats
  • 1 tablespoon brown sugar
  • 1/8 teaspoon ground cinnamon
  • 1 tablespoon butter, melted

Directions

  • In a large bowl, combine the first seven ingredients. In another bowl, combine the applesauce, orange zest, apple, cranberries, milk, and flax egg. Stir into dry ingredients just until moistened. Fill muffin cups coated with cooking spray three-fourths full.
  • Combine topping ingredients ( last 4 on the above list); sprinkle over batter. Bake at 400° for 16-18 minutes or until a toothpick comes out clean. Cool for 10 minutes before removing to a wire rack. Yield: 10 muffins.


Thursday, April 18, 2013

LBD for a Spring Wedding

As I mentioned earlier this week, we had a wedding to attend last Friday. It was a garden wedding on Friday evening at 6:30pm. This left me wondering what the proper attire might be. I decided that my little black dress was the perfect option! It might also have something to do with the fact that shopping with a 1 and 3 year old for dresses is never going to end in anything but frustration!

Being that it's spring and it was a garden wedding I wanted to lighten up the black dress a bit and I turned to my trusty friend, the internet to help! I found tons of great ideas but this was the look that I went with (with a few minor tweaks!)


I already had a LBD so I set off looking for the accent pieces! Thankfully, the kiddos are much more behaved when I am shoe and accessory shopping! So I set off to find a pair of nude heels, a turquoise statement necklace, and an off white scarf (in place of the jacket if it got a bit chilly!) 

I am a heels girl. I wore 4 inch heels for 6+ years to work every single day even while 8 months pregnant (maybe that explains Little Man's early arrival at 35 weeks...) But in the last year, I can count on one hand the number of times I have worn heels. So I was hoping to find a pair of heels that might be cute and comfortable and springy. Of course, wedges were the answer! I totally lucked out and found a steal of a deal on the very first pair that I tried on! And they are crazy comfortable! Not quite the nude pumps from the inspiration pic but these are actually much lighter in person.

Jessica Simpson Catskill wedges


I hit up the jewelry sale section and was shocked to see some really great options! But right away this necklace caught my eye. I loved that it was big, gold, and appeared well made. I was sold when I saw that it was half off of the $48 price tag!


Last on my list was the scarf. Scarves can be pretty pricey, especially solid ones it would seem. I was also looking for one that was a thin gauzy material to work for spring and summer. If you have not ever been into Private Gallery you need to run there ASAP! They have awesome clothes, accessories, and shoes at great prices! I lucked out and found the perfect scarf there for $12. The label says dry clean only which I noticed after my little princess got spaghetti on it and it totally came right up with water. No stain, no damage to the scarf!


Of course, I missed out on the full shot of the outfit but I think that it totally worked! I also love that all of the pieces that I bought can will totally help me to better create outfits from other pieces that I have in my closet to create lots of other looks once the wedding was over.


Lighting Love: Painted Lampshades

As my Master inspiration was falling apart, I started to really struggle to figure out where to go next. I knew that the Ink Trellis cases would be staying so when I saw these beautiful cobalt blue Threshold lamps at Target for $20, I ran like a mad woman to put them in my cart! They are short and wide which works great on our dresser and doesn't block the TV.


I adored the Ikat shades on them and was thisclose to bringing them home with me but I just couldn't commit since I am still so up in the air on the colors. I took the lamp bases home alone and thought that I would try to figure out what to do next. I happened to try out a few of the shades that I have floating around my house and I just loved the way a white shade looked against the blue. So back to Target I went to get some basic white drum shades.

We all know that a trip to Target for one thing inevitably means we get six times as much stuff and you never get what you went for in the first place! I could not refuse a browse down the sale aisle and I found these Threshold coral trimmed medium sized drum shades for $5 each! I suddenly had a stroke of genius! These would be perfect for my blue lamps.


I opted to try something a little different than the usual method of recovering a lampshade.... I decided to try paint! I happened to have a sample of Matte white paint from Home Depot and I used a small art paint brush. Not only did it cover with just one coat, it looks like a beautiful white linen fabric now! In less than an hour, I had 2 white lampshades with coral trim! 


Now the big question is whether the coral will stay in the room or not. I have another thought about taking this DIY to the next level. It all depends of the accent color for the Master. But that's another post for another day!

Linking up at Inspiration Gallery Link Happy Hour Party and Serenity Now

Wednesday, April 17, 2013

End of Vacation Humpday

Well, it's Wednesday and I've been missing for almost a week. It was a super busy weekend week! We enjoyed an amazing wedding on Friday evening (adult night out!) and got to see lots of our wonderful family and friends. Then it was off headed to Orlando on Saturday afternoon with both kids in tow for a 2 day visit with Mickey! It was Little Man's second time there and Fia's first visit. We all had a blast and even got to have dinner with some friends on Saturday who were also visiting Disney.

We had a bit of a longer drive home yesterday as we were towing a Uhaul.... curious what was in inside? Stay tuned for that! Here's a hint... I tried desperately to make it to Ikea since I knew we had the Uhaul to bring back but that didn't happen.

In the meantime, today is full of lounging and lots of laundry. Thankfully I have really cute helpers!


Wednesday, April 10, 2013

Reuse, Recycle, Reinvent: Window Seat

I have been slowly moving forward on the kid's playroom and one of things on my list was to get rid of our old entertainment center. It was huge and since we cut out our cable there was really no need for it anymore. I toyed with the idea of selling it on Craig's List or using it for parts to make a console table. But I am not quite ready for that yet, so I found a great solution in the meantime! Do I get bonus points for using another one of the old items from this room that was taking up space in our storage closet???


Are you ready for the big reveal......


I literally turned the entertainment center so that the front was now the bottom and placed the top portion of the DIY upholstered ottoman/bench on to the top! It doesn't get easier than that and I can always change my mind (a girl is always free to change her mind right?)

Now this clears up some space for me to get moving on the more projects for this room!

Monday, April 8, 2013

Chicken & Bean Enchilada Casserole

 I love Mexican food! I could eat it 5 nights a week! I often wonder if that's because I never even tried it until college or if it's because of my love for any meal that I can eat with avocado? Either way, this meal is stupid easy and a real crowd pleaser! I have made it several different ways and no matter what you choose to throw in, it always turns out great.

Ingredients:
3 cups of shredded chicken (I chose 2 cans of organic chicken breast)
1 can of pinto beans (rinsed and drained) - could sub with black beans, refried beans..... etc
1 can of corn
8 flour tortillas
3 cups of medium salsa (I had no salsa so I made my own! See below!)
3 cups of mexican cheese
1 cup of crushed tortilla chips

1. Preheat the oven to 350 degrees.
2. In a large bowl combine the chicken, beans, salsa, and corn.
3. Add a third of the chicken mixture to the bottom of your casserole dish and top with a quarter of the cheese. Cover with a layer of the tortillas.
4. Continue to layer on the chicken, cheese, and tortillas until you have 3 layers.
5. Top with your crumbled tortillas chips and sprinkling of cheese.
6. Bake for 20 minutes or until the cheese is bubbling.