Showing posts with label Dining Room. Show all posts

Thursday, May 9, 2013

DIY Pottery Barn Rope Chandelier

I love me some Pottery Barn.. especially their lighting! But I do not love their prices. So what's a girl to do? Obviously a DIY knock off project to get the look without the big price tag! And the perfect DIY to link up with The Happy Hour Inspiration Link Party and Serenity Now!

While flipping thru a recent PB catalog, I saw the Rope Chandelier with Jute Shades and it was love at first sight (until I saw the $299 price). Check out the views of it below. Beautiful right? I love the texture of the rope and how casual it feels! And don't even get me started on that table...


After a closer look at the pictures, the shape of the chandelier was almost identical to the builder basic one that we just took down in our dining room. I began to wonder if I could really just wrap rope around our old chandelier to make it look like the PB one? 


Supplies:
Old Chandelier
4 bags of Everbilt Manila Rope from HD
Glue Gun
Scissors
Embroidery Hoop
Chandelier Shades

Let me apologize in advance that there are hardly any pictures of how I did this... between the splinters from the rope and the burns from the glue gun, I just wanted to quickly finish off this project and busting out the camera would have really slowed me down.

This chandelier was gathering dust in the garage for a month or so before this project. I removed all of the glass shades and lightbulbs and then got to work. There was no real rhyme or reason to where I started or how I wrapped the rope. I put a dot of hot glue on the chandelier and just started wrapping....


And wrapping....


And wrapping.....


After 5 whole days of working on this project during naps and in the evenings, I was finished with the rope wrapping of the chandelier! Thankfully, the last step was so easy compared to the winding of the rope all around the curves of the chandelier. I took a wooden embroidery hoop, cut it down to fit the width of my chandelier, and then wrapped it with the rope too. I argued with myself on leaving the chandelier as is or adding the hoop but I think that the hoop really completes the look! I need a serious break from the hot glue gun but I love the way that it turned out!

I found 2 chandelier shade options to try. Hobby Lobby was up first. These were the right color but I did not like the pleating on them. Apologies on the night time picture but I was just so excited to get them on that I could not wait! You can't beat Hobby Lobby prices, it was $30 for all 5 of the shades.


Next it was the Lowe's option. These were a bit bigger and the right shape but stark white. They were marked down to $4.99 each so also a great deal at just under $30 for all 5. The Lowe's shades seem to be a better fit in my eyes. Although I am super annoyed with the clip on shades. Its a daily struggle to keep them straight! But I have never seen any other options. Have yall? I am thinking that if I keep the Lowe's ones I will give them a coat of paint in a more natural color. It was so easy for the DIY Painted shades that this would be a piece of cake for the tiny shades!


But in the meantime, here is the finished product for now...


And a quick side by side comparison with my inspiration image.

Tuesday, March 26, 2013

Cha cha cha changes....

Late last week, I got inspired to make some changes to the Master, which led to some other changes all around the house! These are the best kind of changes because they were free aside from the hours of manual labor I put in to make them happen!

The first domino was in my master closet. I have this beautiful painted dresser that was one of my first DIYs. I have always had it in a closet and I have always hated that no one really gets to see it! And I am on a major mission to meet my closet usable and moving this out will give me some. Uh needed space. And here is why it's making it's way out....


My friends, family, and now the entire world can now know that I am an obsessive outfit changer and the results can be seen above. It's a miracle if I walk out the door in the first outfit that I put on. And it wreaks havoc on my closet organization! But more on that to come!

So where could this pretty little dresser go? My initial thought was the kids playroom. I had fuzzy visions of neatly organized drawers of blocks, trains, and puzzles. But alas, I was home alone and I was not even gonna try and get this monster upstairs solo! But I love where she landed... In the dining room! And you will also notice that another couple of items got moved from the Master. I knew that the dining room needed a pop of color and pattern. The emerald green lamps and Dwell pillows seem to do just the trick!


Tuesday, February 12, 2013

Honey, I love this Honeycomb Light!

As you may recall, I found this amazing little chandelier a few weeks ago. I waffled back and forth on where it should go and ultimately decided that the dining room it was. I waited till a quiet Saturday, then bribed the hubs with a pizza lunch and he was happy to oblige! Because I bought the store model, there were no directions, screws, or even a box. Thankfully, I have a very resourceful husband with Siri on his iPhone and it all worked out okay!

So what do you think? I adore the crazy shadows that it casts when the light is turned on! 


Now that the light is in place, I am wondering about the mirror. I am all over the place on this room. So much I want to do and not sure where to go next! Maybe a rug?


I fell in love with the Ballard Braided Jute rug and after seeing that it was marked down crazy cheap (ummm... $210 for the 8x10 and $240 for the 9x12), I was thinking that might be the next step. Or would that rug be better suited in our family room? Tune in tomorrow when you finally get to see room 1 on the house tour! The family room!


Wednesday, January 30, 2013

Lighting Love

I have been of the hunt for a light fixture to upgrade from our boring basic builder's chandeliers. I have been very slow to pull the trigger because I am trying to take it slow and make sure I am getting something I really love (not to mention at a great price too!)

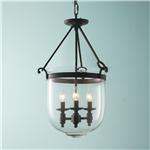
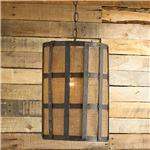
I am loving the look of the organic, vintage, farmhouse lanterns. And I adore these beautiful lights from Shades of Light! If only I had $500 to drop on one light fixture :(


And no post on dream lighting would ever be complete without me including my ultimate dream light fixture... Circa Lighting's Thomas O'Brien Hicks Pendant. A moment of silence please to enjoy this beautiful work of art!


Okay, back to reality! I got an email that World Market was having 30% off lighting plus an extra 15% for Explorer members. So, I packed up the kids and we headed out to check out some lights! Thankfully, my kiddos LOVE to shop and can easily be bribed with food! I had my eye peeled for a couple of the fixtures that caught my interest online and I was floored to see that the online pictures do nothing for the lights!

It was love at first sight for me... and the Honeycomb Chandelier!


I nabbed the very last one that the store had and it was actually the display! The chandelier is huge... like 2 feet across and 16 inches tall. It will make quite a statement piece and I adore that it's just so different. Oh yeah, and it was just shy of $100!

But I must say that I fell in like with one that isn't quite right for my style but would look awesome in many different settings. Check out this uber chic pendant! The shape was unique and the inside of the shade was a beautiful gold leaf. Yeah - go grab the Black Iron Bell Pendant today if you are looking for a clean mod look at a great price! It was %89 plus the 45% off!


So now the big question is.... where to put it? As we pulled into the house, Little Man excitedly asked if he could skip his nap and help me decide where our new 'light' should go! I love that little dude! I love the light so much that I really want it to go in the breakfast nook so I can see it daily but I know it would be perfect in the dining room as well.....

Wednesday, January 16, 2013

Form over Fashion Chairs

While browsing thru my mecca (aka. Home Goods) I saw this set of not so pretty chairs for $79 each! They are almost identical in shape and style to the West Elm slipper chairs which I adore but at oh a third of the price! I happened to be with my mom and aunt and they swooned over them as well! My mom offered to be them for me as a birthday present! You know your old when this is the best birthday gift you could imagine!

Source: West Elm

Here are my chairs. No joke - so close to the WE ones 
(aside from this wild jungle floral fabric!)


The chairs were bought with the intention of reupholstering them or sewing them slipcovers much like these that WE actually sells for $69 a piece!


Well, imagine my surprise when I happened to find two sets of these in a solid charcoal and off white marked down to $9.99 less than a few short weeks after buying the chairs. I like to think of it as fate :)

These chairs and slipcovers have been such a great investment! They have honestly lived in almost every room of our house at one time or another.... 

Occasional seating in the family room...

In there almost forever home, in the great room...

switched out to the dining table in the great room to help with crafting..

And now, they are moving in to the dining room at the new house (for awhile anyways!) But since these chairs are so versatile I am having a hard time deciding exactly how I want to use them. I am leaning towards using them in front of the windows at the heads of the table as seen below. But I feel like they are blending into the tabletop too much.


I popped on the other set that is an off white to see if these looked any better... the contrast with the table works but now they blend into the walls! I even tried to shorten the covers to see if that might help. But still not sold.


It occurred to me that whats missing in this room is a pop of color! So I ran and grabbed my much loved Dwell Citron euro pillows from our bed and bam! While I won't be using this fabric again, I knew right away that this is the answer. As I was writing this post, the idea also crossed my mind to add a seat cushion on back cushion to my chairs much like the WE one. Hey, if I'm sewing might as well go all out right? 


I have also made the executive decision to put together a board for this room before I go any further to help me stay focused and end up with a room I really love!

Tuesday, January 15, 2013

Dining Room Baby Steps

On the top of my 2013 list is our dining room. With the new house, we moved from a great room to a separate living and dining room. This was crazy exciting for me but knowing I have a blank slate is so exciting that I find myself even dreaming about the perfect room! Did I really just admit that? Our dining room is really large with two tall windows, a large opening to the foyer, and a small opening with access to the kitchen and family room via a butlers pantry (LOVE!!!) And did I mention those beautiful wood floors? Yes, I am in LOVE with our house!


It just so happens that my in laws are down sizing and the timing coincided perfectly to our move! My wonderful MIL offered up her set of 6 beautiful French style arm chairs. I am not quite sure where they came from but I have seen similar ones on Wayfair for way more than I would imagine spending on a chair!

Source: Wayfair


I was super excited to try them around my rectangular dining table with 2 extensions. It would have been perfect to have that size table in our dining room and oh yeah it wouldnt cost us anything! Plus that table is in desperate need of being refinished so that would have worked too. But because all of the chairs have arms and my table has a long apron and short overr hang, they just don't work together. 

Please excuse the chaos of this room!!! Its been the catch all for everything that has no home yet! 
Also notice my sad lamp shades that are on their way to being totally naked!

The chairs did work with the round PB table (that also needed a new paint job) that was currently in the breakfast nook but a table that would only accommodate 4 in the dining room was not ideal. Another table marked off the list....


I started searching for another table right after we moved in and was quickly reminded just now expensive tables can be! One of the really cool things about our new locale is that there are thrift stores EVERYWHERE! I even checked those out but needing a taller table table to accommodate the arm chairs made any promising option I found not work. I had just resigned myself to using the round table until I found 'the table' when my mom suggested World Market. 

I took a quick look at their tables online and the first one that jumped out at me was the Verona table. The trestle style of the Verona tables are beautiful and I headed into the store to check it out in person and take some measurements to see if the chairs would work.

Source: World Market

Turns out the color was off and the table was too short for the chairs... But I was able to scout out some of the other tables! The Brooklyn table caught my eye right away because it has a metal looking top and the base is a weathered pine which is what the chairs are and the height was just right. But with a $649 price tag, I mentally crossed it off the list.

Source: World Market

Fast forward a few days.... I was just about to have the hubs drag the round table into the garage to start the refinishing process when....

I got this wonderful email from World Market about their annual furniture sale and some crazy discounts of their best sellers. What are the chances that the table I wanted would be included? What do you know! The Brooklyn table marked down to $299!!! Let's just say I was on the phone at 10:01am right after the email crossed my inbox. And thanks to the hubs, Brooklyn moved in with us on Saturday! And let me say that is one heavy table!


Now comes the fun part of positioning it in the room, deciding on the chairs, maybe DIYing a sideboard, and getting some more stuff on the walls! But we have a table and chairs now!